How Many Ads is best for a WordPress Blog?

The number of AdSense ads you place on your website can have a huge difference on your ad revenue. If you put too little, you risk not earning as much as you can. But if you put too much, you can annoy your visitors and they’ll never be around to click on ads.

So what is the best number of ads to put on your site? The answer: it depends. Depends on your audience, your site layout, and your site topic. Some traffic will be easily annoyed by more ads, while other visitors may not care. Some site layouts make it easy to add more ads without it looking odd, while others look extremely cluttered once you ad more. And some niches/topics have lots of advertisers and thus a variety of ads, while others have less and you’ll see repeated ads.

How to decide the best # of ads

The only way to find out what’s best in your situation is to split test. By testing one ad vs two ads vs three ads you’ll be able to find the best # of ads for your site. Keep in mind that by adding more ads you may not eventually see more revenue, and once that happens you know you shouldn’t add any more.

For example, consider the following scenario:

  • One ad: $50
  • Two ads: $90
  • Three ads: $92

See how adding a 3rd ad block didn’t really increase your ad revenue? In this case, I’d stop at 2 ads. However sometimes you’ll see that by adding more ads you’ll actually earn less, and in that case it’s easy to know which is the clear winner.

Case Study

Consider this site that had 2 decently performing ads. Using AmpedSense, I ran a split test that showed Ad #1 vs Ad #2 vs Both Ads:


numads_forum_post-better
 

So before this site would get either $3 CPM or $7 CPM. Now with both combined it gets $9 CPM, and since they’re unobtrusive it doesn’t bother the visitors too much. This is an increase of 28% in ad revenue!

Yay for increased earnings!

Next round we’ll try a test with 3 ads and see how that performs 🙂

Try Split Testing

The only way you’re going to know which of these works the best is if you AB split test them. If you know how to program, then you don’t need my assistance here. Otherwise, consider using a plugin like AmpedSense to split test your ads to find the optimal configuration that gives you the best CTR.

Here’s how to set up this set of tests in AmpedSense. When creating a new ad recipe to test, note the ‘# Ads on page’ option:


num_ads


To test one ad vs two ads, simply create 2 recipes to test against each other. On the first recipe just choose and configure 1 ad. For the second recipe, choose 2 ads and configure them both.

I suggest trying a split test with your best performing ads, grouping them together into separate recipes. Be sure to preview your recipes to ensure you like the way it looks, as adding too many ads may make your site look cluttered. Let the test run for a week (or less, if you get more traffic), and you’ll be able to see how many ads is the best for you and your website!

Give it a shot and let me know what you find out, would love to hear about your increased earnings!
AdSense or Amazon Associates – Which is better?

I’ve been hearing a lot of people abandoning Google AdSense and switching to Amazon Associates as a way to make money from their websites. Since I love optimizing my sites (and their revenue), I decided to run a test to see which would work best for my websites. I swapped out the ads using AmpedSense for a week, and then looked at the stats. Can you guess which one earned more for me?

The test between Amazon Adsense

I ran this test for a full week to make sure timing of the week didn’t have any effect. I ran it on 3 separate sites (2 niche sites, and 1 tool/reference site). I used 3 different types of Amazon links – native ads, product ads, and direct links. So which was better AdSense or Amazon ads? It probably depends on a whole bunch of factors… but here’s what I found.

Case Study 1 – AdSense Results

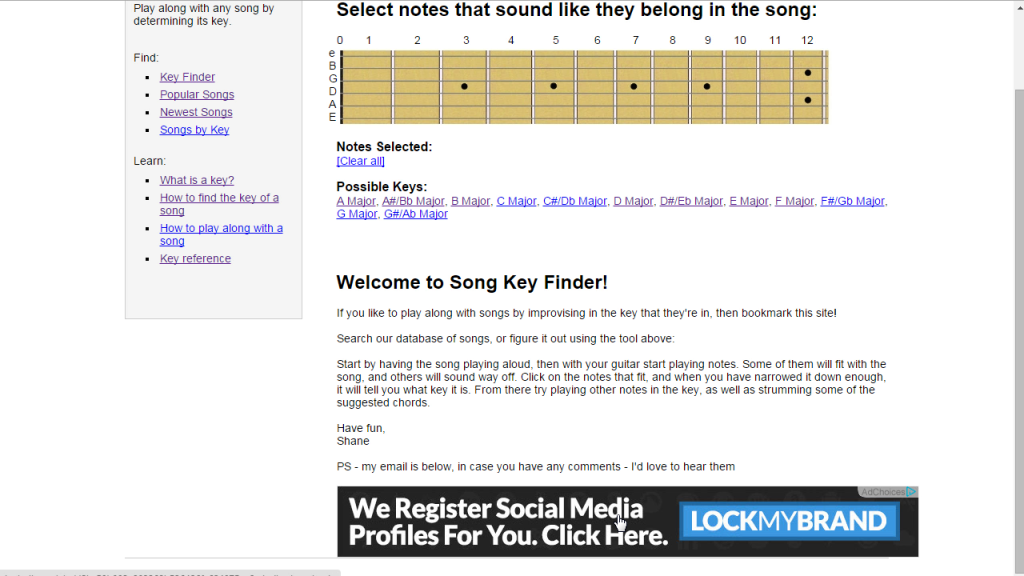
The first site is a site for musicians. Here’s how it looks with AdSense ads:

amazon adsense
 

Case Study 1 – Amazon Results

And here’s the Amazon ads I put on instead. I opted for the native ads, which allows you to specify a search term and automatically generates links for you. I picked a term that matched what my visitors are looking for, and Amazon did a great job filling the listings with relevant products:


amazon vs adsense
 

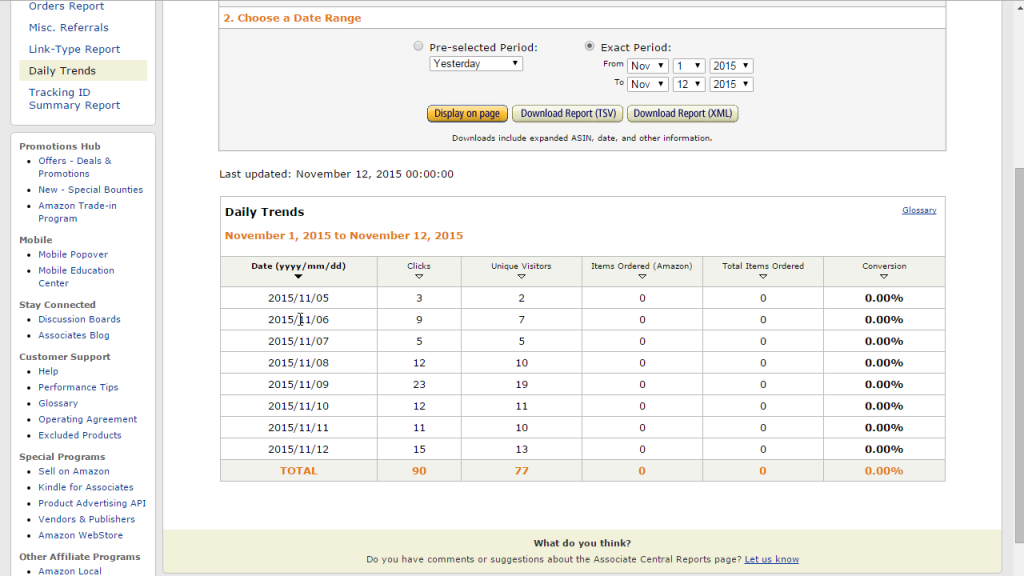
After a week, let’s look at the amazon stats:


amazon ads
 

Uh oh, tons of clicks but no sales. Ouch! How much does this site normally make in AdSense? About $20/week.

Winner: AdSense.

Case Study 2 – Adsense Results

The second site is a niche site focused on jewelry. Here’s how it looks with AdSense ads:


adsense ads
 

Case Study 2 – Amazon Results

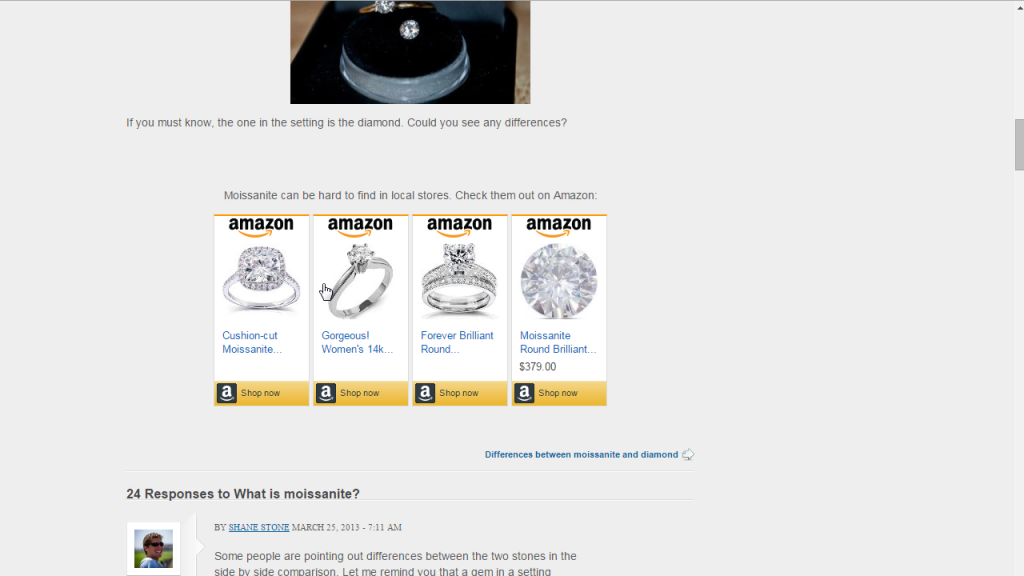
And here’s the Amazon ads I put on instead. I opted for a few specific product ads this time. The products I picked are relatively expensive, so I didn’t have much hope for this, but it’s what my visitors are looking for:


amazon vs adsense
 

After a week, let’s look at the amazon stats:


amazon and adsense which is better
 

Less clicks, and again no sales. Bummer. How much does this site normally make in AdSense? About $5/week.

Winner: AdSense.

Case Study 3 – Adsense results

The last site is a niche site focused on men’s health. Here’s how it looks with AdSense ads:


google adsense amazon
 

Case Study 3 – Amazon results

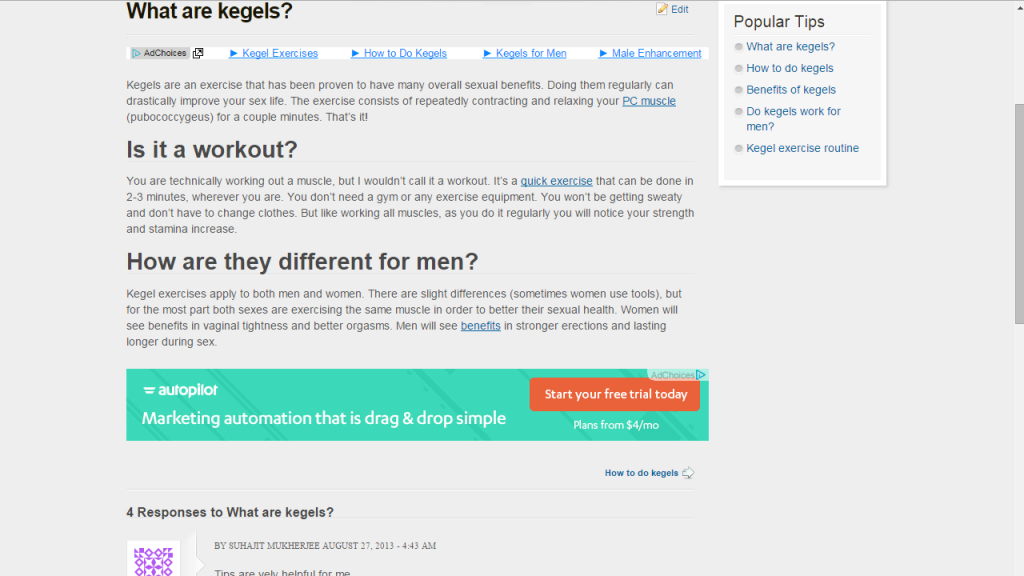
And here’s the Amazon ads I put on instead. I have a lot of users of this site emailing me asking for more info, so a book about this topic is exactly what these people are looking for. I didn’t like any of the images Amazon had, so I created my own, and added my own callouts to it. Here’s how it looks:


keg-azon
 

After a week, let’s look at the amazon stats:


keg-azon-earn
Yay, finally a sale! But 4% of a $9.99 sale is only $0.40. Darn. This site normally makes about $5/week with AdSense.

Winner: AdSense.

Conclusion on my Adsense vs. Amazon ads study

For these three sites, AdSense is the clear winner. Normally between all of these I would have made about $30 for the week, yet with Amazon I made a measly $0.40.

That doesn’t mean that AdSense is superior for all sites – you must test! Every niche, website, and set of visitors is different, and you’ll never know what the best way to earn from your site is until you split test it.


https://www.youtube.com/watch?v=tGupTYFQJcE

What is the Best AdSense Placement for a WordPress Blog?

When most people install AdSense onto their blog, they place it wherever their theme forces them to. Some themes are lucky enough to have widgets to let you choose a few positions, but others don’t. This restricts how much you’re able to earn from AdSense because it may not be the most profitable position. Your theme designer doesn’t know what location is going to give you the most clicks, nor does he care – he just wants it to look pretty!

Luckily I have tested countless sites with different AdSense configurations, and I’ve uncovered a few patterns. But don’t follow this advice blindly – it’s always a good idea to test the ad position yourself to see which will give you the highest click-through-rate, resulting in the most revenue for you!

Where to place my ads?

There are a million places you can put your ads, and they may look alright, but not all of them are ideal for earning money. If you actually want people to see the ads and potentially click on them, I’ve found the best performing positions are within your content. Not in your header, or your sidebar. Not next to your logo or hidden underneath anything – but inside your articles!

Here are the positions I suggest you try for your wordpress site:

  • Above your article
  • Inside your article
  • Below your article

And here’s what each of those looks like:

Above your article

AdSense above your post

Inside your article

AdSense inside your post

Below your article

AdSense below your post

Why does this work?

Putting ads inside your content allows you to utilize the perfect balance of getting your visitors to see your ads, without annoying them. You’re not blasting 3 ads in every corner of your site, but you’re also not hiding them so no one sees them. What’s great about this position is that it’s a win-win for you and your traffic. You get more clicks, and your visitors are still able to read your site without their eyes bleeding from ads.

Case Study

Need proof? Take a look at this chart. It shows the results of testing 5 different positions against each other. The clear loser? The sidebar. Everyone ignores the sidebar. I’ve learned this to be consistent in all the sites I’ve helped optimize.

Results from split testing AdSense positions

Amongst the other ad positions, we were testing two ads inside the content (justified to the left and right), one above, and one below. By looking at the earnings column you can see that the ads placed above and below brought in the most money at a little over $20. Which is better? Also consider the click through rate (CTR). In the long run, a CTR of 1.32% is going to give you over a 50% increase in clicks compared to a CTR of 0.85%, so for this website placing ads directly below the articles is the ideal spot.

Try Split Testing

The only way you’re going to know which of these works the best is if you AB split test them. If you know how to program, then you don’t need my assistance here. Otherwise, consider using a plugin like AmpedSense to split test your ads to find the optimal configuration that gives you the highest CTR.

Here’s how to set up this set of tests in AmpedSense. When creating a new ad recipe to test, note the ‘Ad Position’ option:

AdSense Location Field

Clicking on it will reveal every ad position available:

AdSense Placement Options

I suggest trying a split test with at least 3 different ad positions that naturally fit within your blog. Let the test run for a week (or less, if you get more traffic), and you’ll be able to see which one is the best for you!

Every site is different!

Every website has a different audience, theme, color scheme, and layout – and you never know which ad position is going to work the best for you. That’s why I always suggest testing your AdSense placement on your own site. Not only will you be maximizing your AdSense earnings, but sometimes you’ll find out that the best performing position is not the most annoying – resulting in a placement that both you and your visitors are happy with!

What are the Best AdSense Sizes for a WordPress Blog?

When most people install AdSense onto their blog, they use whatever sizes fit into their theme by default. But your theme designer doesn’t know which AdSense size is the most profitable! It’s a good idea to always test the ad size to see which will give you the most clicks, resulting in the most revenue for you! Another important point is that not all advertisers run ads in all sizes. If you’re limiting yourself to a specific ad size that doesn’t have a lot of advertisers, you’re missing out on AdSense earnings! Look at all these sizes!

  • 300 x 250 – Medium Rectangle
  • 336 x 280 – Large Rectangle
  • 728 x 90 – Leaderboard
  • 160 x 600 – Wide Skyscraper
  • 320 x 50 – Mobile Banner
  • 970 x 90 – Large Leaderboard
  • 468 x 60 – Banner
  • 234 x 60 – Half Banner
  • 120 x 600 – Skyscraper
  • 120 x 240 – Vertical Banner
  • 300 x 600 – Large Skyscraper
  • 250 x 250 – Square
  • 200 x 200 – Small Square
  • 180 x 150 – Small Rectangle
  • 125 x 125 – Button
  • 728 x 15 – Horizontal Large (Link Unit)
  • 468 x 15 – Horizontal Medium (Link Unit)
  • 200 x 90 – Vertical X-Large (Link Unit)
  • 180 x 90 – Vertical Large (Link Unit)
  • 160 x 90 – Vertical Medium (Link Unit)
  • 120 x 90 – Vertical Small (Link Unit)

With so many sizes, it’s tough knowing which is ideal!

The Recommended Sizes

Luckily Google specifies the first 5 in that list as “recommended.” The reason they’re most recommended is because a lot of advertisers design ads for those sizes instead of others. This means you’ll get the most competition on your site – resulting in the highest cost per click!

  • 300 x 250 – Medium Rectangle
  • 336 x 280 – Large Rectangle
  • 728 x 90 – Leaderboard
  • 160 x 600 – Wide Skyscraper
  • 320 x 50 – Mobile Banner

Here’s an example of each of those sizes within a wordpress blog:

300 x 250 – Medium Rectangle

300 x 250 - Medium Rectangle

336 x 280 – Large Rectangle

336 x 280 - Large Rectangle

728 x 90 – Leaderboard

728 x 90 - Leaderboard

160 x 600 – Wide Skyscraper

160 x 600 - Wide Skyscraper

320 x 50 – Mobile Banner

320 x 50 - Mobile Banner

Why do these sizes work the best?

The reason they’re most recommended is because a lot of advertisers design ads for those sizes instead of others. This means you’ll get the most competition on your site – resulting in the highest cost per click!

Think about it. If you pick an obscure size that fits perfectly with your custom theme, there may only be 100 advertisers that have created ads for that size. But if you pick one of the more common sizes, there could be 100,000 advertisers that are actively paying for ads of that size. More advertisers means they have to outbid each other (kind of like eBay), which means more money for you!

Case Study

Need proof? Take a look at this chart. It shows the results of split testing two different ad sizes against each other. A small 468 x 60 Banner and a larger 728 x 90 Leaderboard:

Results from split testing AdSense sizes

Not only does the larger ad get more clicks (almost 2x as much), check out the RPM (revenue per thousand views) as well – over 4x the improvement! This exemplifies what we just discussed, a recommended size having more competition (and thus more earnings) than a typical ad.

Try Split Testing

The only way you’re going to know which of these works the best is if you AB split test them. If you know how to program, then you don’t need my assistance here. Otherwise, consider using a plugin like AmpedSense to split test your ads to find the optimal configuration that gives you the best CTR.

Here’s how to set up this set of tests in AmpedSense. When creating a new ad recipe to test, note the ‘Ad Size’ option:

Creating a new ad recipe in AmpedSense

Clicking on it will reveal every ad size there available:

Choosing an ad size to test in AmpedSense

I suggest trying a split test with at least 3 different ad sizes from the “recommended” list that naturally fit within your blog. Let the test run for a week (or less, if you get more traffic), and you’ll be able to see which one is the best for you!

Every site is different!

Remember the point I made about advertisers using different ad sizes? Also keep in mind that every topic has a different set of advertisers, so no one ad size is going to work the best on every site out there! Every website has a different theme, color scheme, and layout. That’s why I always suggest testing your AdSense sizes on your own site. Not only will you be maximizing your AdSense earnings, but you can rest easy knowing you’re not missing out on lost income!

What are the Best Adsense Colors for a WordPress Blog?

When most people install AdSense onto their blog, they use the default colors that Google has picked. But Google doesn’t know how your website looks, or what colors your visitors respond to best. It’s a good idea to always test the ad colors to see which will give you the most clicks, resulting in the most revenue for you!

Consider these color options:

I’m aware there are thousands of colors in the rainbow. And each AdSense ad has various elements that can be different colors:

  • Ad headline
  • Ad text
  • Ad url
  • Ad border
  • Ad background

This leaves you with so many options you’ll never know which is the best set of colors to use! But don’t worry, for most blogs you only need to try 3 different sets:

A. Match your website


Make everything blend in with the colors of your blog. Use the same background and action colors, text colors, and borders. Some people don’t like to do this because it could trick the user into thinking they’re clicking a link on your site (instead of an ad), but it typically has a high success rate.

B. Stand out from your website


Grab your visitors attention by not blending in to your current blog’s theme. People will most likely realize it’s an ad, but they’ll also be looking at it, which is good.

C. Use Google’s Defaults


Google is run by advertising geniuses who have tested thousands of colors in order to pick the ones that work the best overall. Don’t underestimate their defaults – they are solid contenders.

Case Study

Check out the results of a test I performed where I tried the three color combinations above over the course of a week:

Results of split testing AdSense colors

Close call, huh? 😉

How awesome is that – the ad that has colors that match your site blew the others out of the water. Even better than Google’s default (which proves that I’m smarter than Google, right?? Haha). 17 clicks vs 2 clicks is hugely different – I’ll take a $7 RPM over a <$1 RPM anyday! Let the money start rolling in with this 7x increase in earnings!

Try Split Testing

The only way you’re going to know which of these works the best is if you AB split test them. If you know how to program, then you don’t need my assistance here. Otherwise, consider using a plugin like AmpedSense to split test your ads to find the optimal configuration that gives you the best CTR.

Here’s how to set up this set of tests in AmpedSense…

First recipe testing similar colors:


Second recipe testing different colors:


Third recipe testing Google’s default colors:


Start these tests, wait a couple weeks (or quicker if you have lots of traffic), and let the results tell you which is the best!

Every site is different!

There are people out there that claim they know the best color combination for any site, but I find that hard to believe. Red always catches attention? Green always makes people happy? Blue always means hyperlink? That’s all bogus.

Every website has a different theme, color scheme, and demographics (for example, women respond to colors differently than men). That’s why I always suggest testing your AdSense colors on your own site. Not only will you be maximizing your AdSense earnings, but you can rest easy knowing you’re not missing out on lost income!